Did you realize that over 2 million users use Instagram to message friends, consume content, and learn information? Understanding how to add location on Instagram can change the exposure game on this giant platform.
Actually, users are eager to show local products and services right in the application. Thus, for any user who would like to be found, it is important to add a location to your content.
If you are a small business owner looking for a location on the map, or a content creator trying to get a local audience, using the location functionality will help create more engagement with users! So, would you like to be discovered? Let’s get going!
How to Create a Custom Location Using Facebook
To create a location tag on Instagram, you will need to first create a new location on Facebook.
This seems surprising at first, but it makes sense since Facebook owns Instagram, and they use two linked, overlapping location databases.
Looking to check your competitors’ Instagram stories anonymously?
Open Facebook & Tap ‘Check In’
Before you can add a location, you must create the location through the Facebook mobile application of Facebook. Log on to your Facebook account through the app and then:
1. Tap on “What’s on your mind” at the top of the News Feed
2. Look for the ‘Check In‘ button underneath the status bar, and tap this to open the Facebook location services to create your custom tag
3. Make sure your phone’s location services are on for the next step so Facebook can find you (this is crucial if you’re actually at your business location)
Search & Tap ‘Add a New Place’
When you click on Check In, you will be brought to a search field and other locations around you. After this step:
- Start typing the name of your location into the search bar.
- Then scroll down to the bottom of the search results.
- You will see a selection called “+ Add a new place.”
Often, the “Add a new place” may not appear first, so it’s worth trying different versions of your location name or scrolling through several results to find it.
And if Facebook notifies you with an error saying “This location cannot be added,” you will need to enter a different version of the name.
Enter Name, Address, & Pin on Map
After clicking “Add a new place,” you’ll land on a “Create a Custom Place” page:
- Enter your business or location name using proper capitalization
- Choose the most relevant category for your business – select carefully because it will impact how people find your location.
- Enter the full address, including street, city, and zip
- Pin the location in the exact spot on the map – this step is critical to enable check-ins and other actions
Lastly, make sure to take care with spelling and grammar in the name of your location, as this exact text will show when people tag your location in either or both platforms.
Save the Custom Location
You’re almost done!
- Check your information for accuracy.
- Tap “Save Custom Place” to create your location.
- Then, search your newly created location on Facebook to confirm it exists!
Your custom location won’t show up on Instagram immediately. The sync between Facebook and Instagram can take from a few hours to weeks to show.
As soon as it syncs up, your new custom location can be used to tag your posts, stories, and reels.
After creating your new location, you can, if you’d like, claim it as a business next. To claim your new location, simply search for it on Facebook and select the “claim this location” option.
You will gain even more control over how you appear as a business on both Facebook and Instagram.
| Platform | Time to Create | Appears On | Requirements |
| Immediate | Location services enabled | ||
| Not possible directly | Instagram only | Must create on Facebook first | |
| Both | 1-14 days for syncing | Facebook & Instagram | Facebook and Instagram accounts linked |
How to Add Location on Instagram Posts & Stories
Adding locations can beneficially increase the visibility of your content on Instagram, which can also help you make more money on Instagram.
Once you create a location tag on Facebook, you will be able to tag that location regardless of the content type you are sharing on Instagram. Let’s discuss how to add locations in various formats on Instagram.
How to Add Location to an Instagram Post
Including a location in your Instagram post is simple and can increase engagement on your post by 79%! Here’s how it’s done:
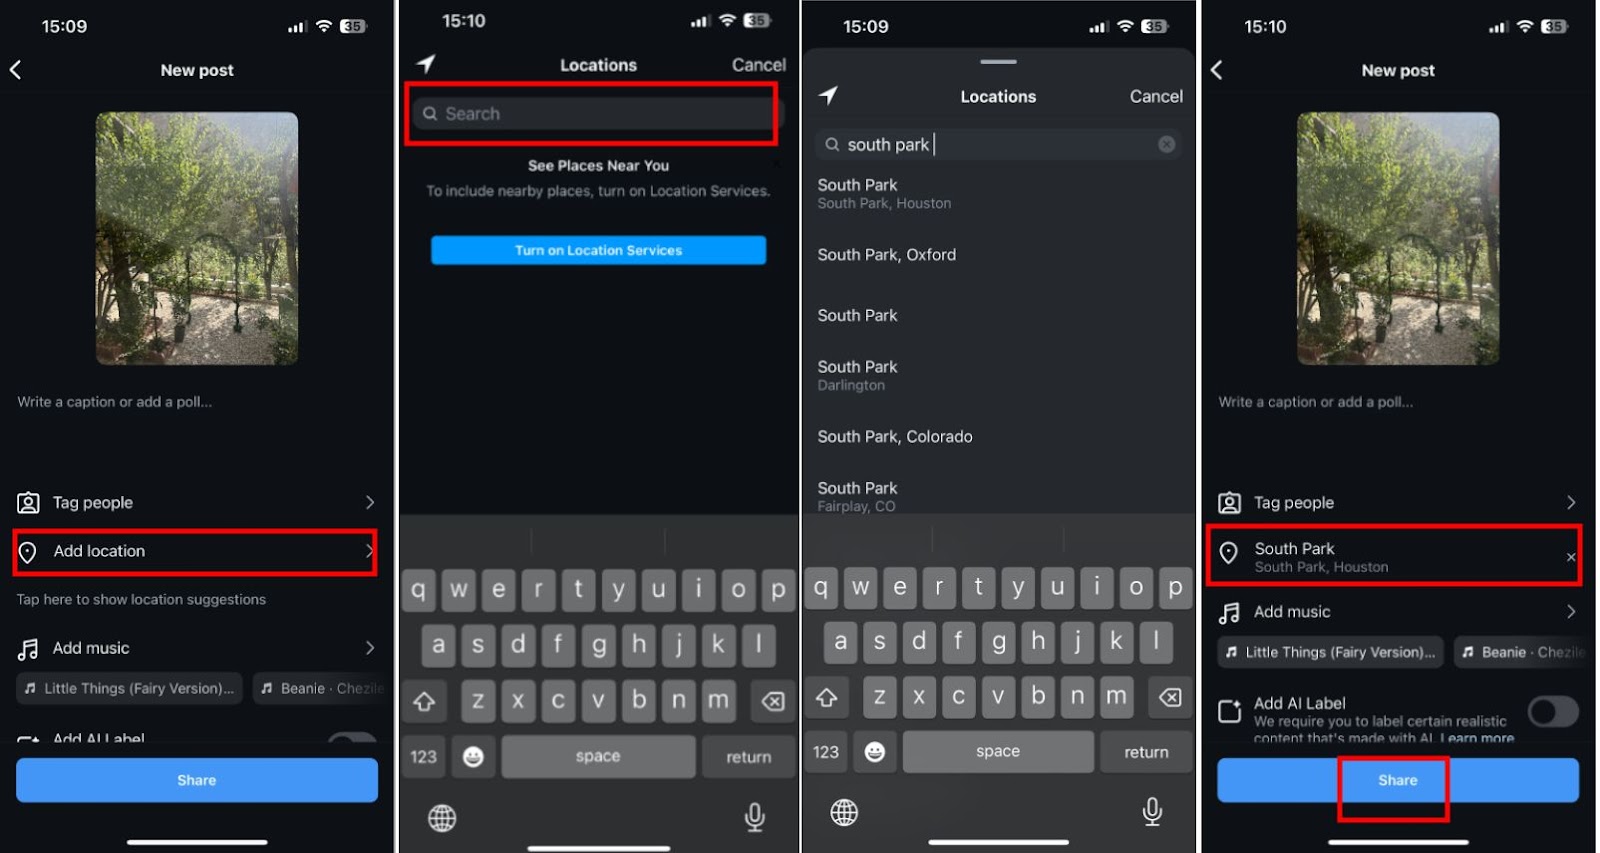
- Click on the “Plus” symbol at the bottom center of your Instagram application
- Select the photo or video you want to share and select Next
- Edit your photo and add your caption just as you normally would
- Click “Add location” just below the caption section
- Search for your desired location or accept one of the suggestions that come up nearby
- After selecting a location, you’ll return to the creation screen
- Double-check and afterwards click share to post your geotagged post
After posting, your location will appear right at the top of your photo, and anyone searching that location will find users who have posted about that location.
How to Add Location on Instagram Story
Location-based feeds are where you’ll find stories tagged to a location, and they expose your Story content to new audiences besides your current followers.
Adding a location sticker to your Story is a very simple procedure:
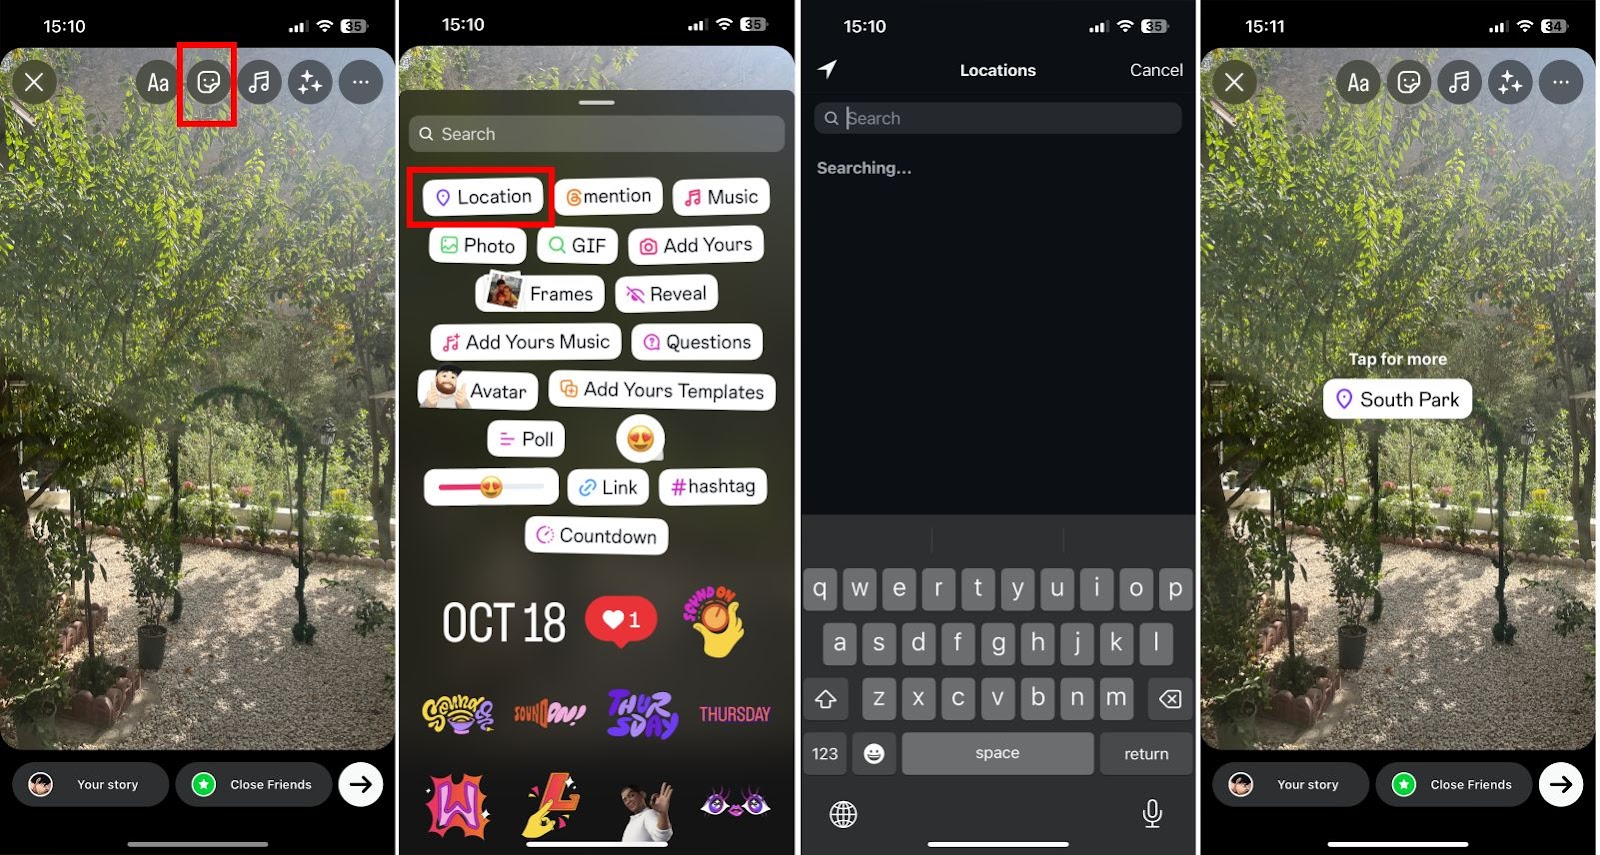
1. Tap your profile picture or swipe right to create a new Story.
2. Capture or upload your content.
3. Tap the sticker icon located at the top of the screen.
4. Select the “Location Sticker” option.
5. Search for and select your location.
6. Drag the sticker anywhere in your Story.
7. Tap the sticker repeatedly to see different options.
8. Share to “Your Story” when you’re ready to share.
The location sticker does two things for your viewers. It shows them where you are, but it also makes your Story discoverable in the collection for that location.
Also, if you’re looking to download an Instagram story, see what we suggest.
How to Tag a Location on Instagram Reels
Instagram Reels with location tags can reach local audiences more effectively. There are two methods to add location to Reels:
Using a location sticker:
- Create your Reel content
- Tap the sticker icon and select “Location”
- Choose your location
- Position the sticker on your Reel
Adding location tag:
- Complete your Reel editing
- Before sharing, tap “Add location” on the sharing screen
- Select your desired location
- Publish your Reel
Unlike story location stickers, the second method makes your Reel searchable in location-based feeds, potentially increasing your reach.
| Content Type | Location Addition Method | Visibility Boost |
| Posts | “Add location” field | Appears in location feed |
| Stories | Location sticker | May appear in the location story |
| Reels | Location tag + sticker | Searchable in the location page |
Keep in mind, locations can only be tagged in Instagram posts if they already exist. If your desired location doesn’t show up, it has to be created first through Facebook before coming back to Instagram, as noted earlier.
How to Add Location to Your Instagram Profile & Bio
Aside from stories and posts to get your location on Instagram, having your location in your Instagram bio helps followers easily locate your physical business.
Here are a few different ways you can share location information in your bio and profile.
How to Add Location on Instagram Bio
For businesses wanting to showcase their physical address, Instagram provides a built-in option. This feature is exclusively available for Business accounts. To add location:
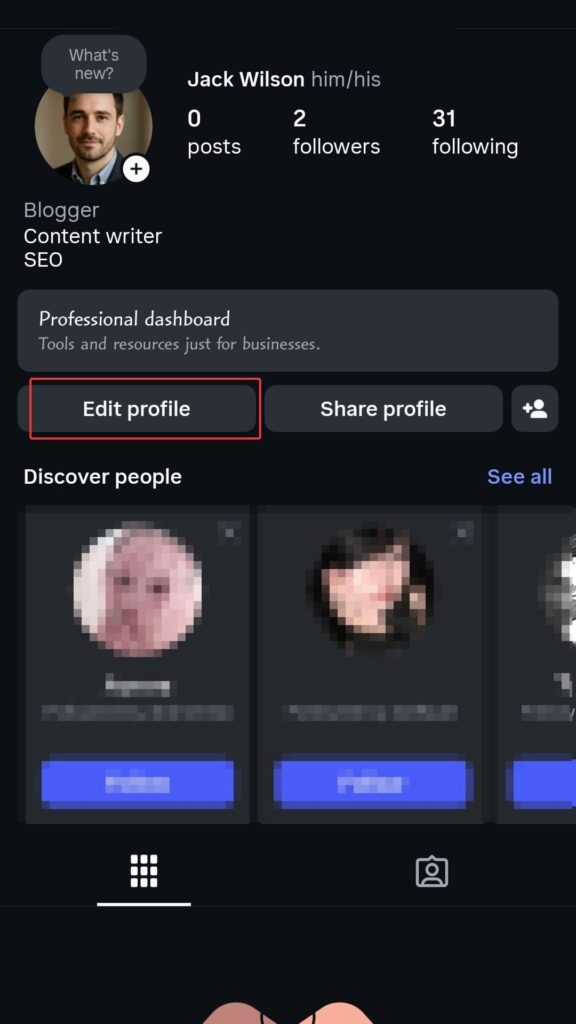
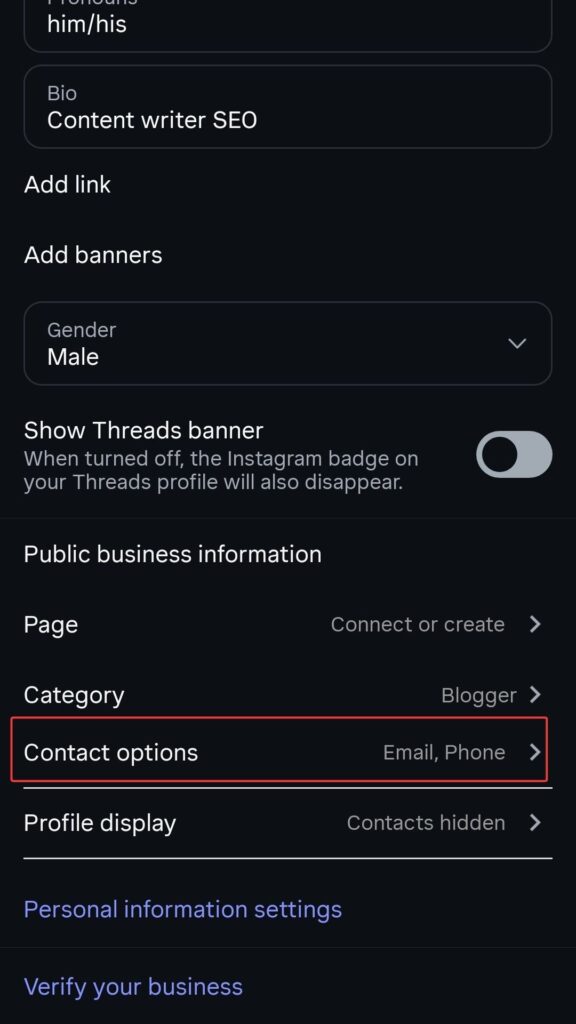
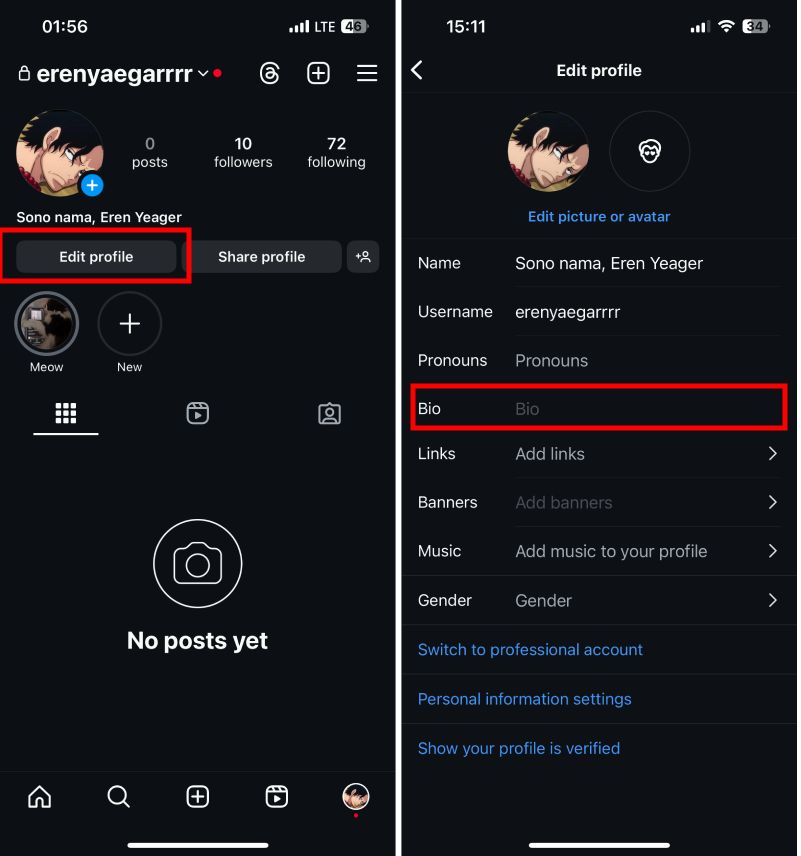
- Open Instagram and tap your profile picture
- Select “Edit profile”
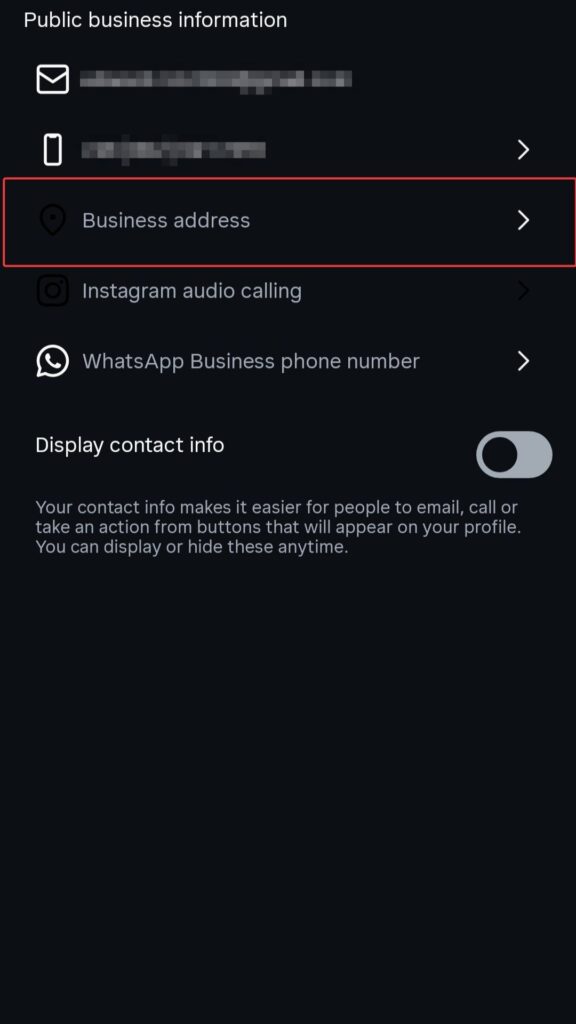
- Tap “Contact options”
- Choose “Business address”
- Enter your address details (street, city, zip code)
- Tap “Done” to save changes
After saving, your location appears as a clickable link below your bio, allowing followers to get directions directly through map apps.
How to Add Location on Instagram Profile
Only Business accounts can display locations directly in their profiles. If you haven’t switched yet:
- Go to your profile and tap the menu icon
- Select “Settings” then “Account”
- Tap “Switch to professional account”
- Choose “Business” and select your category
- Complete the setup process
After switching, follow the steps from the previous section to add your address. Meanwhile, your location will remain visible to all profile visitors, helping potential customers find you.
Using Google Maps Link in Your Bio
You can also add a Google Maps link, no matter what type of account you have:
- Open Google Maps and search for the location.
- Select “Share” and copy the link.
- In the Instagram app, go to “Edit Profile.”
- You’ll see an “Add External Link” option under Links.
- Paste the Google Maps URL and name it.
This method will work even on a personal account and allows you to share multiple locations.
Why Adding a Location on Instagram Matters
Adding your location on Instagram is not simply a bonus option for an extra step. In fact, it is a strategy to help you gain more visibility and better overall results.
Here, we will discuss why including your location should be part of your Instagram strategy.
Boosts Local Discoverability
When you’re geo-tagging on Instagram, you’re literally placing yourself on the digital map for those potential local customers who are looking for products or services in your area.
Each time you tag your location in a post, you’re telling the Instagram algorithm, “this post should be shown to these users.
If you own a burger restaurant located in Richmond, Virginia, your business posts will be viewed by users in Richmond and not by any user from New Mexico.
Moreover, people searching for locations will even see your geo-tagged posts, similar to a hashtag search, also using the most popular Instagram hashtags can boost the process as well.
This is critical for brick-and-mortar businesses as 80% of Instagram users report using Instagram to do product or service discovery. More consumers are relying on Instagram to discover local businesses instead of using Google.
Improves Engagement with Nearby Users
One of the strongest cases for adding a location to your post, or for businesses, to their content, is the increased engagement. You can see 79% more engagement when you add location tags.
This is mainly because of three reasons:
1. Content tagged with a location appears on feed posts that are tied to that specific location.
2. Local audiences tend to engage with content two to three times more.
3. The Instagram algorithm favors posts that utilize all features available to you.
| Content Type | With Location Tag | Without Location Tag |
| Posts | 79% higher engagement | Baseline engagement |
| Stories | Appears in the location story | Limited to followers only |
| Reels | Better performance in local feeds | Less local visibility |
Even a local influencer with just a few thousand followers can significantly benefit businesses. Additionally, once they add a location filter, they can really refine their audience to local potential buyers.
Helps Build Brand Trust & Visibility
Location tagging enhances trustworthiness in three significant ways.
- First, it reflects authenticity: you’re a unique individual in a distinctive place versus just sharing a generic post from a popular place. This honesty can develop trust with your audience.
- Second, when users tag your business in their post, they give you free advertisement that has greater credibility than branded content. The consensus is, many individuals view information from real people as more reliable than a business.
- Third, location tags provide an immediate connection for your audience based on where you are located, improving your Local SEO efforts for search engines to gain trust that your business is actually located there based on location tags. Additionally, not many businesses with an online store use location tags to share brand personality, connect with communities, and build connections locally.
To sum up, adding your location (location tag) to Instagram posts can be another means for your business to raise awareness in your community.
Troubleshoot & Tips for Better Reach
In some cases, even when everything is set up correctly, users run into issues using the Instagram location features.
Below are some easy troubleshooting tips and ways to increase your reach.
What to Do if Your Location Doesn’t Appear
If you’re attempting to add a location to Instagram and cannot locate the tag you want, start with the basics:
Check that you have location services turned on for the app:
- On iOS: go to Settings > Privacy & Security > Location Services > Instagram > select “While Using the App” to enable.
- On Android: go to Settings > Location > App permissions > Instagram and select allow location access.
If location services are already enabled, yet problems persist:
- Update your Instagram app to the latest version
- Clear the app’s cache (Android: Settings > Apps > Instagram > Storage > Clear Cache)
- Check your internet connection stability
- Verify if Instagram servers are experiencing downtime
How to Claim Your Business Location
After creating your custom location through Facebook, claiming it provides additional control:
- Connect your Facebook and Instagram accounts in Accounts Center
- Search for your newly created location on Facebook
- Look for the “claim this location” option and follow prompts
- Complete verification if required by Facebook
This connection allows you to manage how your business appears on both platforms simultaneously and improves your discoverability in location searches.
Tips to Make Your Location More Searchable
To maximize the 79% engagement boost that location tags provide:
- Use accurate spelling and proper capitalization in your location name
- Position map pins precisely when creating custom locations
- Incorporate location hashtags alongside your location tag
- Encourage customers to tag your location in their posts
- Post consistently using your location tag
- Create content relevant to your physical location
- Use your location tag across all content types (posts, stories, reels)
By implementing these strategies, you’ll make your Instagram location more discoverable and increase your chances of appearing in local searches.
Adding Location Tags Boosts Your Local Reach
Including location tags in your Instagram content is a simple way to grow locally!
From increasing engagement as high as 79% to making your business more discoverable, tagging a location allows you to connect with those around you and be discovered in searches.
Whether you are a business, creator, or someone who is purely looking to connect more locally, begin tagging a location to expand your reach and foster stronger local connections.
Answers You Might Look for
Here are some frequently asked questions about this topic:
1. Can You Add the Location to the Instagram Story After Posting?
No, IG stories can’t be edited, so you cannot add a location to them after it has been posted.
2. Why Can’t I Add My Business Location on Instagram?
Make sure it is created and verified on Facebook. Instagram uses Facebook’s location database, so your business must be listed there first. Check that all details are correct and that the location is public.
3. How to Create a Location on Instagram Without Facebook?
Currently, there is no way to create a new location on Instagram without using Facebook. Instagram relies on Facebook’s location database, so any new location must be created through Facebook first.